Tuesday, August 21, 2018

How to enable CSS Preprocessor SASS/SCSS in Angular 6

11:22:00 AM 2
To enable CSS Preprocessor SASS/SCSS in Angular 6 project, we have update the config file (angular.json) or we can do it by Angular-CLI

By default, if we run ng new project-name using terminal/cmd, the angular framework will be installed without enabling CSS Preprocessors in angular. To overcome this, follow the simple procedure shared below

Scenario 1: ( Enabling SASS/SCSS in existing Angular project )
Using Angular-CLI
  • ng config schematics.@schematics/angular:component.styleext scss  

Manually
  1. Open angular.json file 
  2. Find "schematics": {} 
  3. Add "@schematics/angular:component": { "styleext": "scss" }  

After enabling CSS Preprocessor, just do following steps
  1. Update all .css files to .scss (style.css in src folder and all custom generated components etc..)
  2. Open angular.json file 
  3. Update all "src/styles.css" to "src/styles.scss" Stop the server and restart.. All set to go with SCSS. 

Scenario 2: ( Enabling SASS/SCSS in new Angular project )
Using Angular-CLI 
Add --style=sass with the command to create new angular project ng new project-name --style=sass

Tuesday, July 17, 2018

Find and replace text or link in all the wordpress posts and pages

5:46:00 PM 0
Searching and replacing contents in all the wordpress posts and pages is an easy task. You can use either plugin or manually using SQL query. In this article, we will let you know the SQL query to find and replace particular text or word from wp_posts, wp_postmeta tables
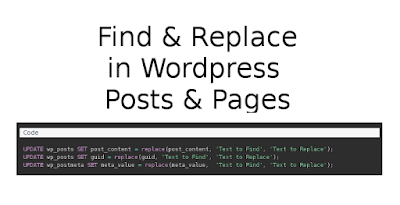
Find and replace in wordpress Posts and Pages

Before starting the find and replace in wordpress posts and pages task, take backup of entire website database. If you are good in SQL, then take backup of wp_posts and wp_postmeta tables alone

You can use following queries to update all the http requests to https after installing SSL certificate

Syntax

update TABLE_NAME set FIELD_NAME = replace(FIELD_NAME, 'Text to Find', 'Text to Replace');

Query

UPDATE wp_posts SET post_content = replace(post_content, 'Text to Find', 'Text to Replace');
UPDATE wp_posts SET guid = replace(guid, 'Text to Find', 'Text to Replace');
UPDATE wp_postmeta SET meta_value = replace(meta_value,  'Text to Find', 'Text to Replace');

Friday, July 13, 2018

Laravel Case Sensitive Query

5:05:00 PM 1
PHP Laravel is one of the popular PHP frameworks. It has many inbuilt functions to reduce developers efforts while developing projects. To perform case sensitive search in laravel, there is no inbuilt function provided as of Laravel 5.6. So, now how we do it ?.

user_table
id name
1 Eshin
2 Jozer
3 W3schools100

We have to use MySql function BINARY in where clause to perform case sensitive querying. The MySql example is,

SELECT * FROM 'user_table' WHERE BINARY 'username' = 'W3schools100';  

So how we do in Laravel
We have to add DB::raw() raw query to make case sensitive query. For example

DB::table('user_table')->where(DB::raw("BINARY `username`"),'W3schools100')->get();
or
DB::table('user_table')->whereRaw("BINARY `username` = 'W3schools100'")->get();

Tuesday, July 3, 2018

Bootstrap show/open tabs based on url hash

6:30:00 PM 0
Bootstrap tabs can be switched based on url hash. Bootstrap has provided a jQuery method to open/show tabs programmatically. As we know manual selection of tabs will display appropriate content associated with that particular tab, but to open bootstrap tabs based on url hash follow this blog post by w3schools100

How to add URL hash with a tag

To add URL hash with anchor tag. just append hash value at the end of URL. Example https://w3schools100.blogspot.com/#myCustomHash

Get URL hash using javascript

The syntax to get URL hash is window.location.hash;. By using this, we can identify which tab to be opened.

Open bootstrap tab by jQuery

To open bootstrap tab by the function provided by bootstrap javascript, use $('.nav-tabs a[href="#myCustomHash"]').tab('show'). How to open bootstrap tab by URL hash - Example

How to open bootstrap tab by URL hash - Example

var hash = window.location.hash;
if(hash != '' || hash != undefined)
$('ul.nav a[href="' + hash + '"]').tab('show');

Monday, June 11, 2018

Make youtube video iframe full width 100% to container and height | Responsive Youtube Player

10:01:00 AM 0
Youtube is providing easiest way to embed videos using iframe. For fixed height and width, this works fine. But for responsive designs, we have to do some CSS tricks. Lets go and learn the magic to make youtube video player responsive.


Youtube Responsive Video Player - HTML


 <div id="video-wrapper">
  <iframe width="560" height="315" src="###" frameborder="0" allow="autoplay; encrypted-media" allowfullscreen></iframe>
 </div>


Youtube Responsive Video Player - CSS


 #video-wrapper {
     position: relative;
     padding-bottom: 56.25%; /* 16:9 */
     height: 0;
 }
 #video-wrapper iframe {
     position: absolute;
     top: 0;
     left: 0;
     width: 100%;
     height: 100%;
 }

Thats it guys. Simple right ?. Work on it and leave your valuable feedback on comments section.

Popular  searches for this thread
  • Displaying a YouTube video with iframe full width of page
  • How To Make a Responsive 100% Width YouTube iFrame Embed
  • Embed a video at 100% width and keep aspect ratio?
  • Responsive youtube player html
  • Youtube iframe player responsive

Thursday, May 17, 2018

How to create a sticky notification bar on top of the website using CSS

7:03:00 PM 1
Creating sticky hello bar is a very easy task. Just css is enough make this. On page scroll, it will be stick at the top of website. This type of notification bars are also call as top fixed bar for website
Sticky bar Using CSS

Copy following html, css codes and paste it below body tag of your website. That's it, you are done. Very easy right ?. Work on it and let us know your feedback via comments.

Note: Overflow: hidden should not be given to parent elements


HTML Code : Add it below body tag of you website


    <div id="sticky_bar">
        <div id="sticky_bar_text">
            Your notification goes here ..
        </div>
        <div id="sticky_bar_btn">
            <a target="_blank" class="btn" href="#">Sample Button</a>
        </div>
    </div>


CSS Code


#sticky_bar {
    padding: 8px 5px;
    background: #222;
    position: sticky;
    position: -webkit-sticky;
    top: 0;
    z-index: 999;
    text-align: center;
    box-shadow: 0px 1px 11px #888888;
    color: #fff;
    font-family: 'Viga', sans-serif;
    font-size: 1.1em;
}
#sticky_bar_text, #sticky_bar_btn {
    display: inline-block;
}
#sticky_bar_btn a {
  background:red;
  color:#fff;
  padding:2px 5px;
  text-decoration:none;
  border-radius:3px;
}


Demo


Search Keywords
  • Website top sticky bar 
  • Simply sticky hello bar
  • Fixed Notification bar for website
  • Sticky bar in html
  • Sticky bar css
  • Fixed bar on top of website

Friday, February 17, 2017

Select2 autocomplete dynamically from server based on input

12:53:00 PM 0
Select2 is one of the best libraries to add in the sections where to need a textbox autocomplete options. Many entry level developers feel easy to do static autocomplete feature but they feel difficult to add dynamic values in select box. 
Select2 dynamic autocompete
Here we are going to give code to get get dynamic values in the select2 selectbox based on the input given in select2 textbox. 

<link href="https://cdnjs.cloudflare.com/ajax/libs/select2/4.0.3/css/select2.min.css" rel="stylesheet"></link>
<script src="https://cdnjs.cloudflare.com/ajax/libs/select2/4.0.3/js/select2.min.js"></script>
 
<script>
  $("#select_box_id").select2({
    ajax: {
      url: "server page link",
      dataType: 'json',
      delay: 250,
      data: function (params) {
        return {
          campaign_name: params.term, // search term
        };
      },
      processResults: function (data, params) {
     var values = [];              
     $.each(data, function (key, val) { 
      if(val._id != '')
      {
        values.push({
         id: val.id,
         text: val.campaign_name
        });
      } 
     }); 
     // Sample json data -> [{ id: 0, text: 'enhancement' }, { id: 1, text: 'bug' }, { id: 2, text: 'duplicate' }]
        return { 
          results: values, //appending values from server to options tag
        };
      },
      cache: true
    },
    escapeMarkup: function (markup) { return markup; }, // let our custom formatter work
    minimumInputLength: 2,
  });
</script>
If you have any doubts, feel free to share below.. We will respond as soon as possible.